 Thinking back to the end of my UNIX days, there had been something called SSH. It had been a replacement for telnet and had a nice feature called SSH keys. SSH keys were a safe and easy way to replace those tiresome passwords. I loved them!
Almost at the same time, Windows came up and I lost contact with UNIX. I always hoped, IT will switch over to Linux, but it never happened and my UNIX knowledge got outdated as it bhad been of no more use to me. Until NetScaler came up! But most of my knowledge had been gone.
Recently I had to copy Citrix ADC / NetScaler’s WAF signatures from the production- to the disaster recovery site. This had to be done via SSH and it’s brother SCP (secure copy). Both of them don’t support a password parameter, so I had to rethink. And SSH keys came in my mind. And indeed: It’s supported. There are some white papers (i.e. CTX109008, CTX109011, CTX120804, CTX109009 and probably some more) but I didn’t like these for several reasons, so I decided to write my own guide.
How SSH keys work
It’s asymmetric cryptography (you remember, this public key/private key thing? Alice & Bob?). There is a pair of keys, nowadays mostly 2k (2048 Bit) keys, one of them to kept private, the other one public. Instead of specifying a password, client and server exchange some encrypted information to make sure, the private key on the client matches the public key on the server.
The first thing to remember:
- The private key on the client
- The public key on the server
Which user?
Well, that’s a weak point and something to think about. There is no “user” in our keys. There is no persistent /home directory on a Citrix ADC / NetScaler. So all key-pairs allow to log on as any of the local users. Whoever has a private key is able to impersonate every local user. Usually, there is just one local user: nsroot.
It’s impossible to impersonate a user other than local users. Given, I want to use my LDAP user, johannes.norz, I will also have to create a local user johannes.norz, allowing external authentication for this user.
But the idea is to impersonate root; nsroot in our case.
Creating a key pair
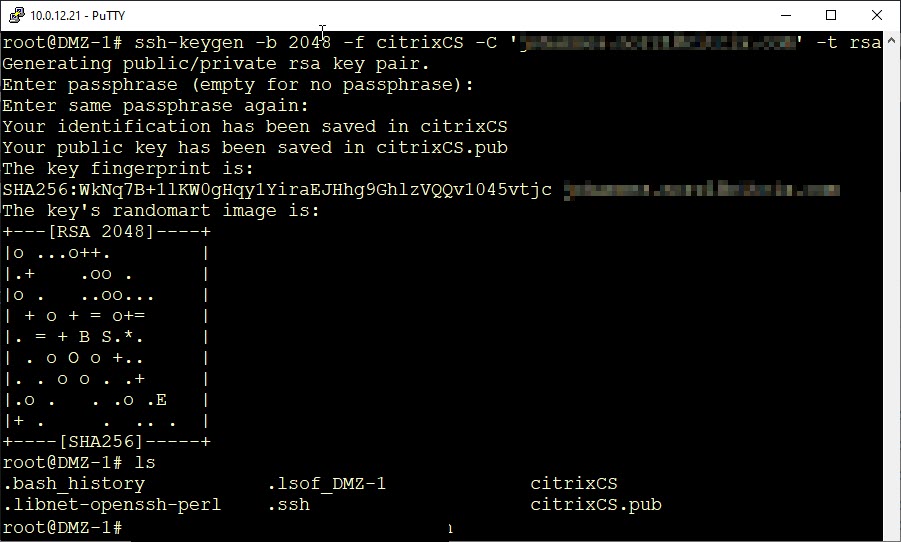
There are several ways to create a key pair. For example, putty’s keygen could do it for us, but I won’t use putty, as putty uses a different key format. I will use our Citrix ADC / NetScaler to create keys. There is a command for this: ssh-keygen.
ssh-keygen -b <key-strength> -f <fine-name> [-C '<your mail-address'] -t <type of key>
- -b, the key strength should be 2048 nowadays.
- -f, the file name, can be whatever you want.
- -C is an optional one. The idea is to specify the email address of the creator, so others can contact the owner.
- – t should be RSA
During key generation, you’ll get asked for a passphrase. You may leave it empty, or specify a strong pass-phrase if needed. Don’t use weak ones, they just bother you and are of no use.
Now we have a pair of keys on our Citrix ADC. A private key and a public key. The private key – in my case citrixCS – should be kept private (that’s why we call it private), as it allows any owner of this key to log on, while the public – citrixCS.pub – key is no security-problem.
Next step: Making a Citrix ADC / NetScaler trust a key pair
A Citrix ADC has to trust a key pair of course. It has to know the public key of a key pair. All SSH-keys go to /nsconfig/ssh. Per default, there is an important file in this directory: authorized_keys. It contains all public keys with permission to log on to the system.
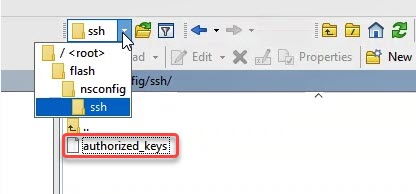 Our next task is, copying the private key into the /nsconfig/ssh/authorized_keys file. This can be done by simply cat-ing the file and pipeline the standard output into this file in append mode (>>):
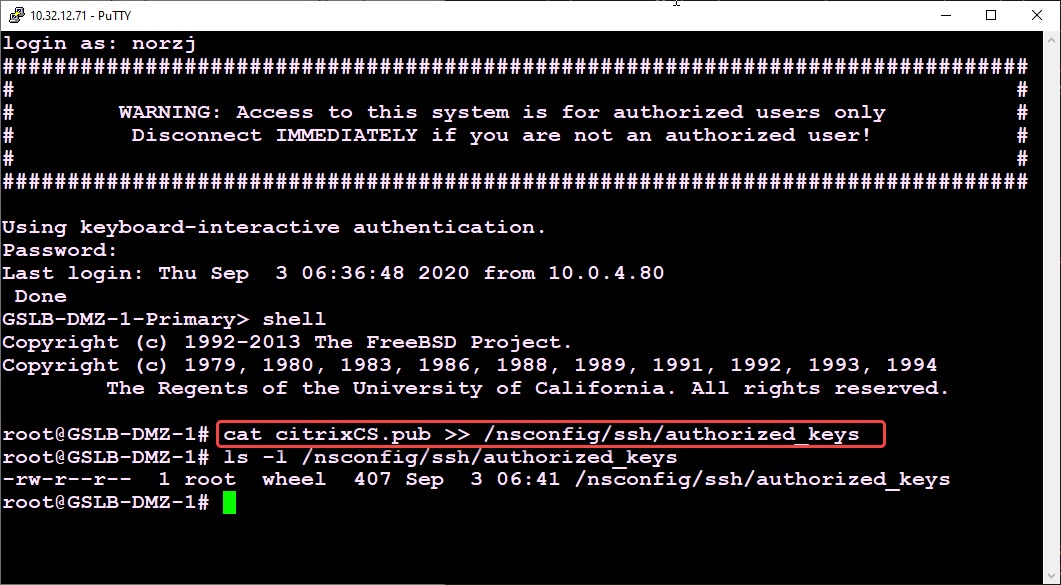 That’s all. Our ADC now trusts our key-pair! We may now use this key-pair to log on.
Logon from another Citrix ADC / NetScaler
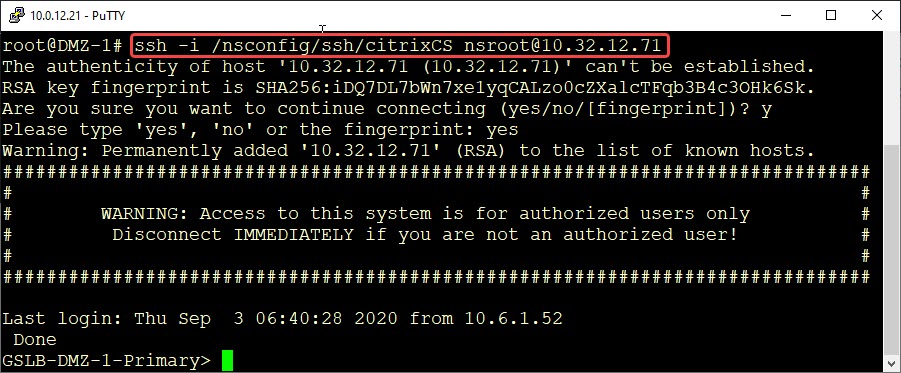
We can now use this key-pair to log on from another Citrix-ADC. It’s quite simple. But before we do this I would strongly recommend storing the private key somewhere else, as /root is in ram only and our key will get lost after a reboot. I store it to /nsconfig/ssh.
ssh -i <location of the key> <user@target-system>
- -i: the location of the private key
- user@target-system: the local user we want to impersonate and the system we want to connect to.
You can see easily: No password needed. The user logged on, we see the remote Netscaler-shell of the target system.
Using PuTTY
PuTTY is the most frequently used SSH client on Windows. PuTTY has it’s own way to deal with SSH keys. So we can’t just simply use our key, but we have to import it into PuTTY.
We could have made our key using PuTTY as well, there is a good white paper about it: CTX109009.
To use our previously created key, we have to import it into PuTTY using PuTTY’s keygenerator available from PuTTY’s download page.
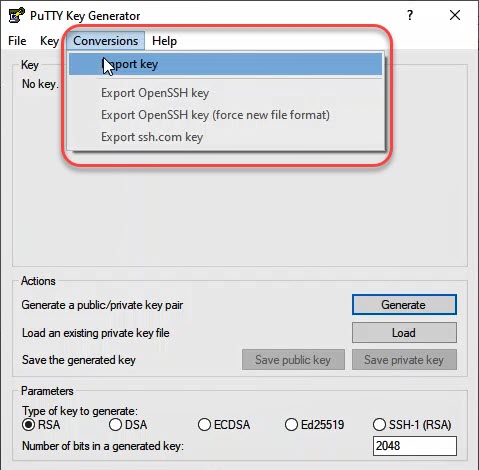 Import the private key into PuTTY key-generator. Then save the key to a location you consider to be safe.
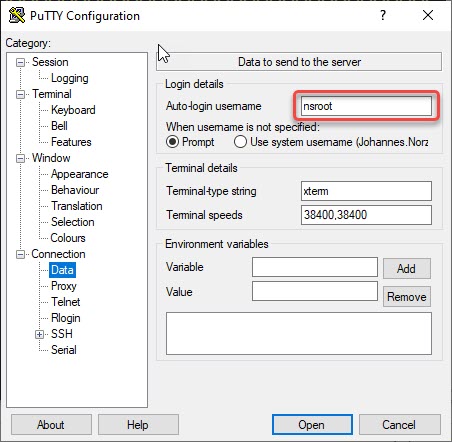 Navigate to Connection → Data and specify a user-name (it has to be a local user on Citrix ADC / NetScaler!)
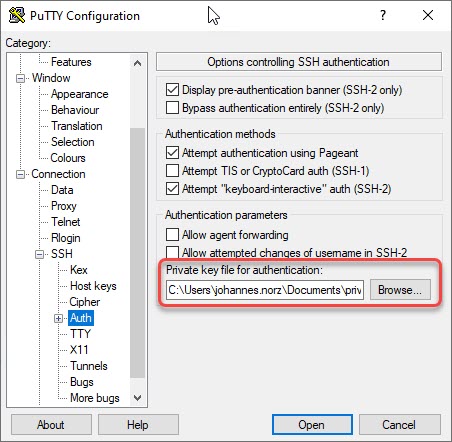 Navigate to Connection → SSH → Auth. Browse for the privatre key previously exported from key-generator.
Save the connection. That’s it!
Comments, suggestions and remarks are highly welcome!

