
The way we create certificates has not changed significantly over the years. Only the wizard is subject to a certain change. This blog is based on Citrix ADC 13, elder versions don’t differ significantly.
The following steps are necessary to create a certificate:
- Generate the key pair
- Create the certificate-signing request
- Generate the certificate (either using Citrix ADC / NetScaler’s CA, or an external certification authority)
- Import the certificate into the Citrix ADC / NetScaler
- Linking the certificate to the intermediate certification authority certificate
- Binding the certificate
I will use the wizard to create certificates.

Generate the key pair
A key pair is a combination of a public and private key. The strength of the key depends primarily on its length, because it cannot be calculated, you have to try every possible key if you want to break it. We keep the keys as long as possible so as not to give attackers the chance to guess our keys. The length must be a power of two, i.e. 2, 4, 8, 16, 32, 64 and so on. Citrix ADC / NetScaler supports key lengths of 512, 1024, 2048 and 4096 bit. Today’s browsers only support 1024 bits in exceptional cases, but usually 2048 and 4096 bits.
The disadvantage of long keys is that the effort needed to establish an SSL connection depends very much on the key length. The number of SSL transactions per second in Citrix specifications for the ADC / NetScaler refers to 2048 bit certificates. It will drop down to 25% for 4096 bit certificates. Because the certification bodies currently use 2048 bit certificates, there is usually no point in going to 4096 bit. Therefore, our certificates will usually be 2048 bit certificates.
We will start the server certificate wizard of our Citrix ADC / NetScaler. As expected, creating the key pair will be our first step.
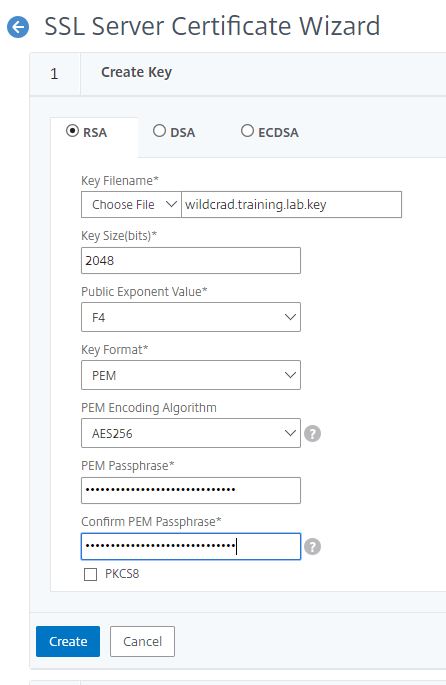 Key Filename: the name of the key. Over time there will be quite a few files in the /nsconfig/ssl directory. It is therefore advisable to adhere to a consistent naming convention. In the end we will have three files: the key file, the certificate signing request and the certificate, all of which belong together. I usually name the certificates after their host names and add extensions to the files. The Citrix ADC / NetScaler, like any UNIX system, doesn’t care about extentions, but I use .key for the key pairs, .csr for the signing request and .cer for the certificate.
Key Size: 2048 or 4096, see above. At this point the wizard takes any number between 512 and 4096, but the standard only supports 1024, 2048 and 4096.
Public Exponent Value: The exponent can be 3 or F4 (0xF4=244). If you do not have a preference, use the default value. This value is part of the cipher algorithm which is required to create your RSA key (Citrix).
Key Format: The format in which the key is saved. Possible values are DER and PEM. DER keys are stored unencrypted, PEM keys are encrypted. Citrix and I clearly recommend using PEM.
PEM EncodingAlgorythm: DES, DES3 and AES. DES is the weakest algorithm, a 128 bit encryption. DES3 is basically the same, but is encrypted drastically one after the other, which increases security somewhat. AES 256 is the more modern encryption method and should be our choice.
PEM Passphrase / Confirm: The PEM pass phrase is the secret we use to encrypt the private key. It should be 30 characters long and complex. I usually use password generators to create the password. The password is usually not required any more after creating and installing the certificate; it goes to the documentation.
Creating the Certificate Signing Request (CSR)
The certificate signing request (CSR) is practically the certificate, but the signature of the certification authority is still missing. We can imagine that it is the completed form, ready to be signed by the certification authority.
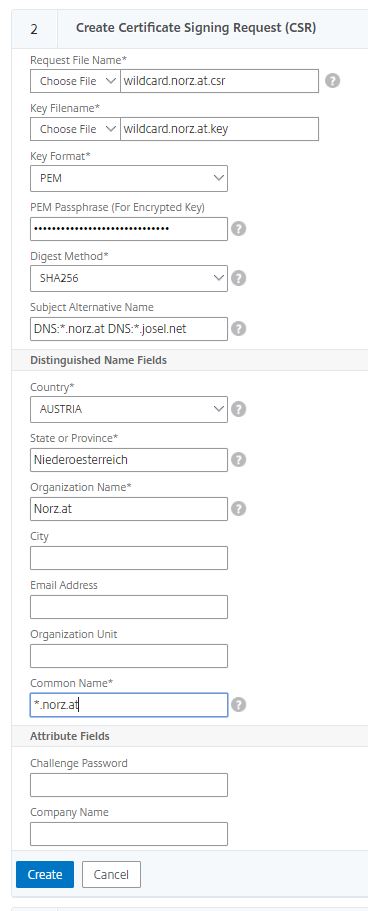 Request File Name: The name of the file. I use the same as with the key-pair, but with an extension of .csr
Key File Name: the name of the previously created key file. It gets pre-populated here.
Key Format: The format of the key (PEM / DER). It gets pre-populated here.
PEM Passphrase: The pass-phrase we used before. Unfortunately not prepopuleted.
Digest Method: The digest method we chosed before. It gets pre-populated here.
Subject Alternete Names: For about a year now, browsers have been asking for a Subject Alternate Name (SAN) on the certificate. This can be one or more names. These are the host names for which the certificate should be valid. If you want to use several SANs, you have to use them in the format DNS: FQDN and separate them from each other with spaces (CTX232305 and CTX227983). Some certification authorities ignore what you have entered here.
Country/State or Province / Company …: Here you describe the owner of the certificate. Only the values with an asterisk are required.
Common Name: The common name is the name of the host to whom the certificate will belong. Even though it’s mandatory this entry itself is outdated and replaced by Subject Alternate Names. Some certificate authorities ignore what they have entered here.
Challange Password: Not needed, Leave blank
Company Name:Not needed, Leave blank
Creating the certificate
Creating a certificate using Citrix ADC
The next step, our wizzard offers, is creating the certificate. However, no browser will trust this certificate, because we do not have an official certification authority, i.e. one that is generally trusted. So we either have to add an exception for this website in the browser or add the Citrix ADC / NetScaler certificate as a trusted root certificate to the list of trusted root certificate authorities.
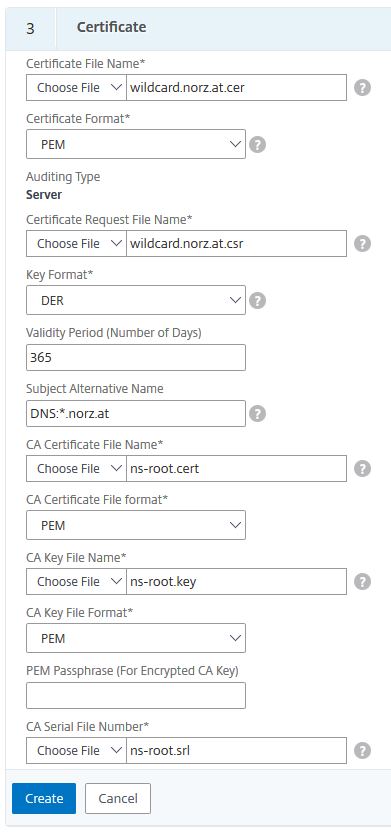
Choose a file Name: the name of our certificate
Certificate Format: PEM or DER. For Citrix ADC / NetScaler we usually use PEM.
Certificate Request File: the CSR we did during last step (pre-populated)
Key Format:PEM or DER. Citrix ADC / NetScaler’s built in certificate is PEM
Validity period: How long will this certificate stay valid? Default is 365 days, it may be anything from 1 to 3650 days. On internet we don’t allow certificates to be valid longer than a year.
Subject Alternate Name: a list, comma separated, of names, appearing on the certificate in subject alternate name section. This one will overwrite the SAN name in the CSR.
CA Certificate File Name: The certificate used to sign our certificate. It’s the root-CA file name. The one, built into Citrix ADC / NetScaler is ns-root.cert
CA Certificate File Format: PEM is the format of this file (you might also use DER keys instead)
CA Key File Name: The certificate used to sign our certificate. It’s the root-CA file name. The one, built into Citrix ADC / NetScaler is ns-root.key
CA Key File Format: PEM is the format of this file (you might also use DER keys instead)
PEM Passphrase (For Encrypted CA Key): leave blank, this key is not encrypted!
CA Serial File Name: The name of the file, containing the last certificate’s serial number. The one, built into Citrix ADC / NetScaler is ns-root.srl
Using an external Certificate authority
You can use any certification authority you want. I’m using DigiCert to demonstrate the process. First you have to create a digicert user account and log in. I already have it.
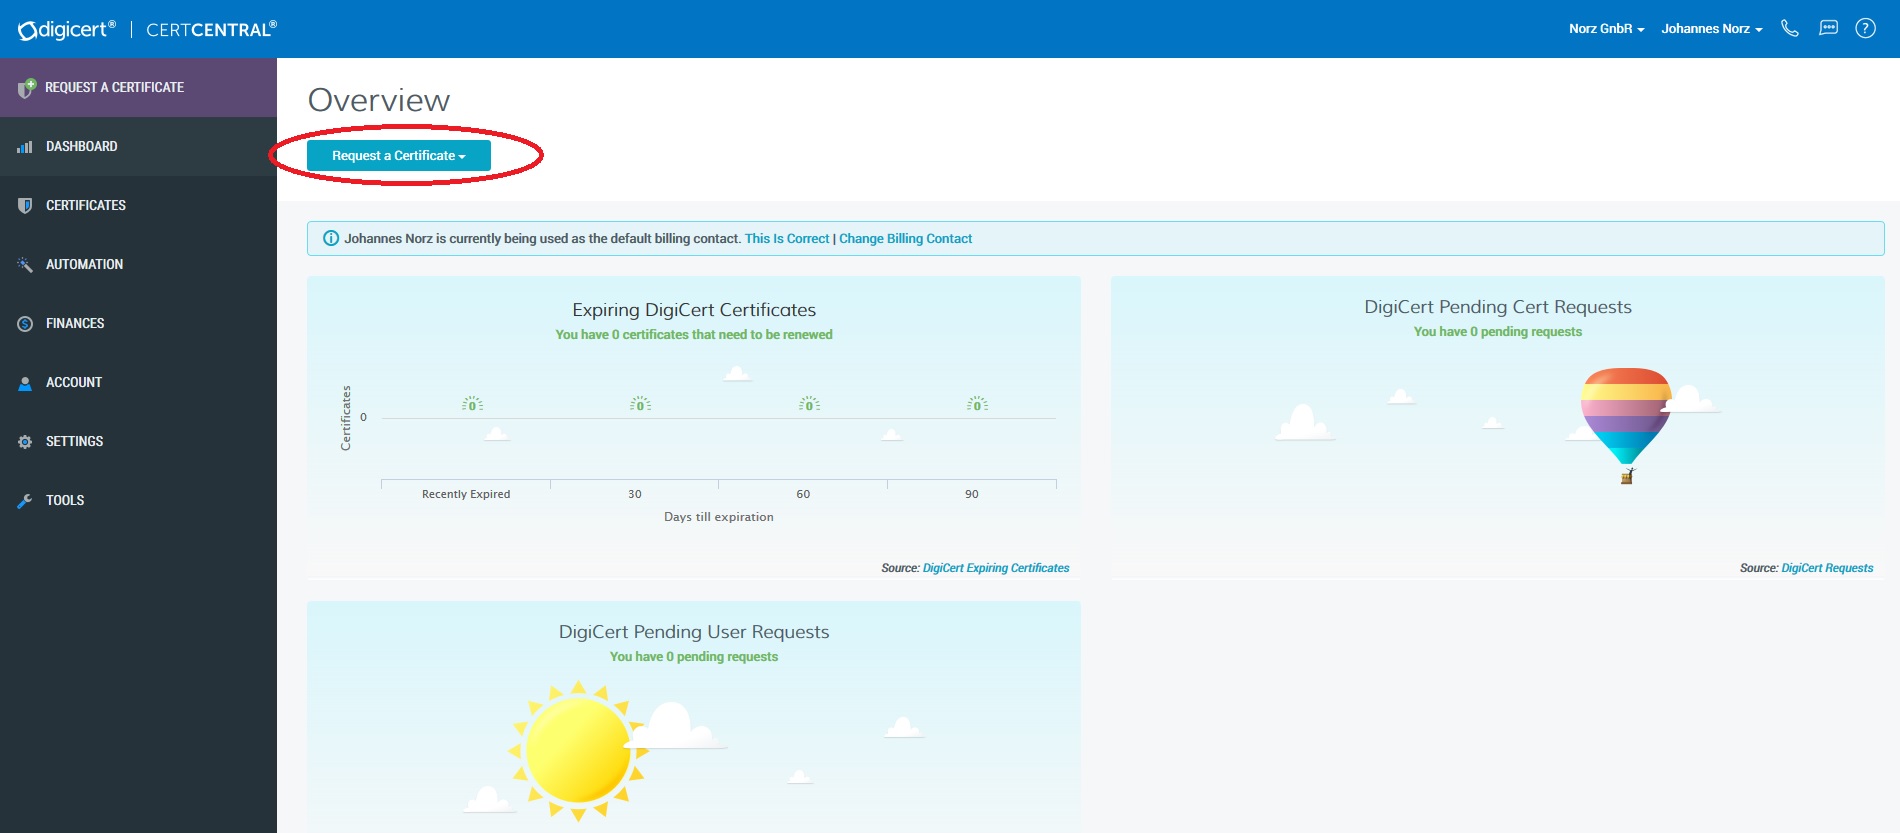 Click Request a Certificate and choose Request GeoTrust Cloud DV
Download the CSR (either using WinSCP or by using Traffc Management -> SSL -> Manage Certificates / Keys / CSRs (Tools section).
A CSR will look like that:
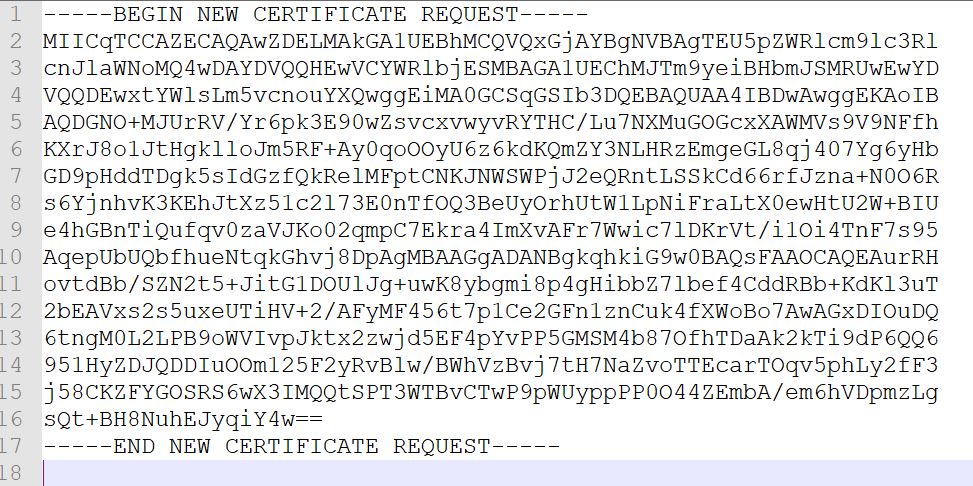 We have to put all into clipboard, including —–BEGIN NEW CERTIFICATE REQUEST —– to —–END NEW CERTIFICATE REQUEST—–. Don’t remove a single character!
Now we have to paste it into DigiCert’s form.
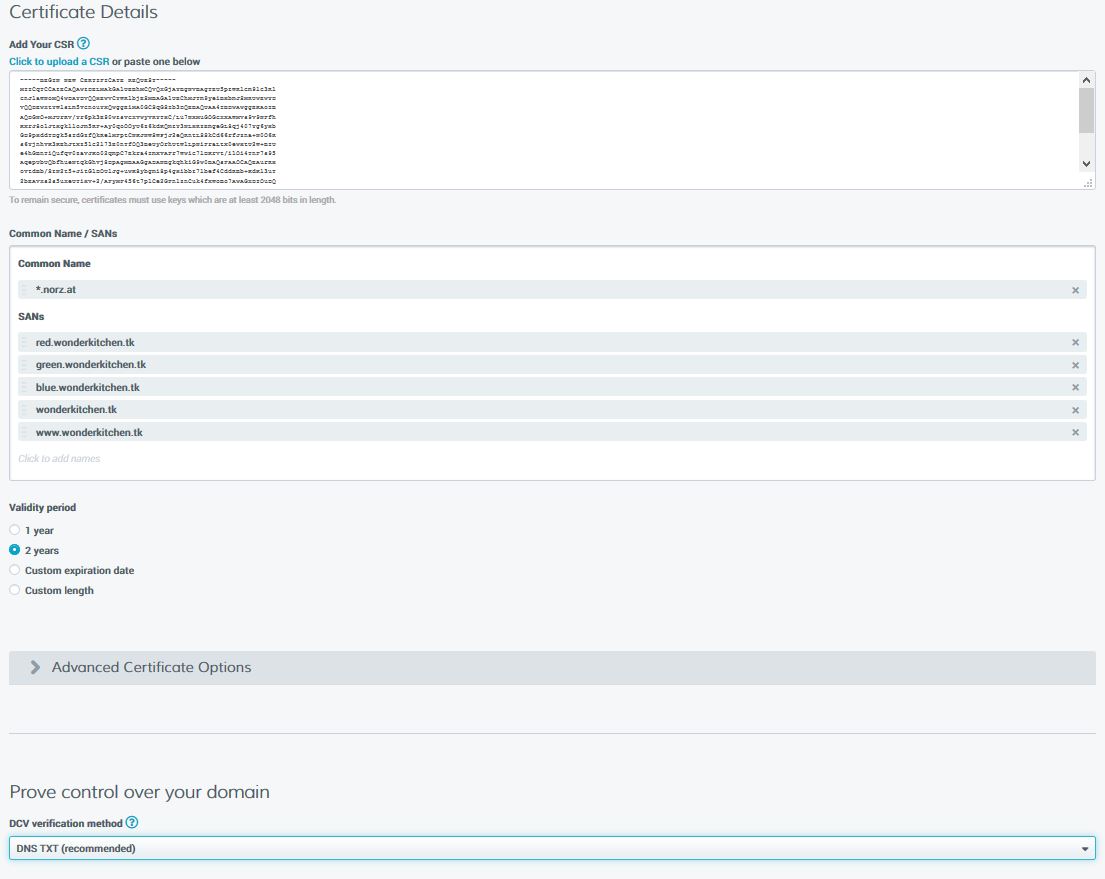 So the CSR has to get pasted into Add Your CSR.
Common Name / SANs: The common name is the “main name” on the certificate. In my case it’s *.norz.at. This is the FQDN of the server owning the certificate. This one usually gets pre-populated from your CSR, but you may delete it and choose a new name. My certificate is a so called “wildcard certificate“. This certificate would be valid not just for norz.at, but also for www.norz.at, gateway.norz.at, w3.norz.at or blog.norz.at.
In my case, this server has several names. All the other names are called SANs (Subject Alternate Names). I never submitted this CSR, as I have no need of SANs. I just filled it for demonstration purpose.
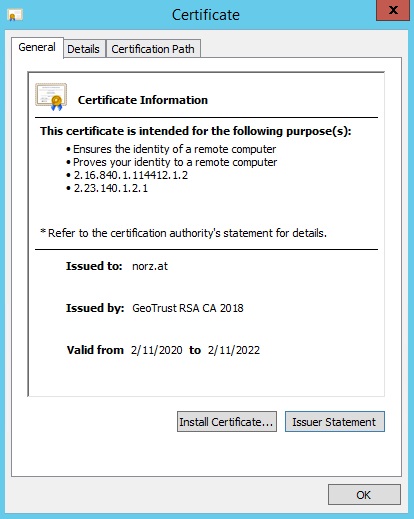
Validity Period: The time, this certificate will stay valid. You may take a look at the certificate (by double clicking it) and check the validity.
Prove control over your domain: You will have to prove you are the owner of this domain. There are several methods of validation. The usual one is a DNS TXT record. You have to be able to control your domain and put a TXT record into your DNS server. This method is quick and safe.
An other method would be via Email. By default, emails, containing a token, are sent to all WHOIS contacts or domain accounts for each domain. In this case, the domain validation must be completed for each domain (including SANs) on the certificate.
Last not least, you also have File. You would have to put a certain file into every domain, mentioned in the certificate.
I choose DNS TXT, as it’s quick and easy.
You will have to select an organization and a billing contact and agree to the terms and conditions and submit the form.
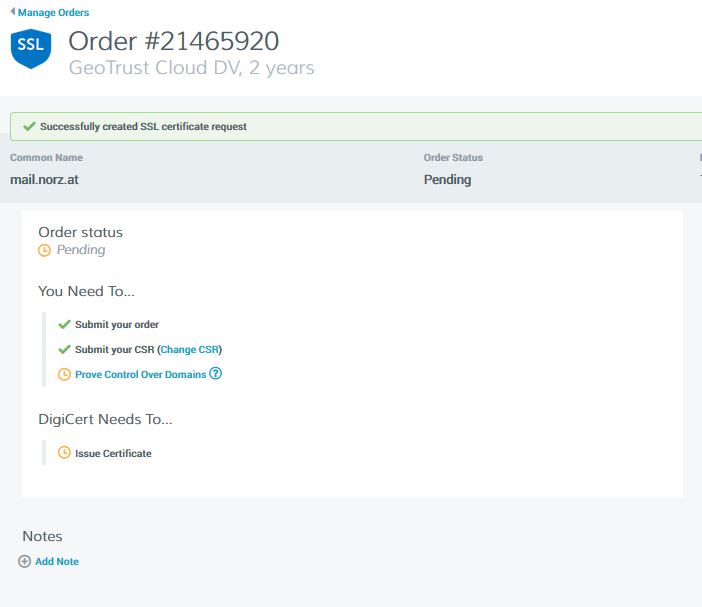 Next step: We have to prove, we own the domain. So we click on “Prove Control Over Domain“. We may now change the method of testing.
E-Mail validation
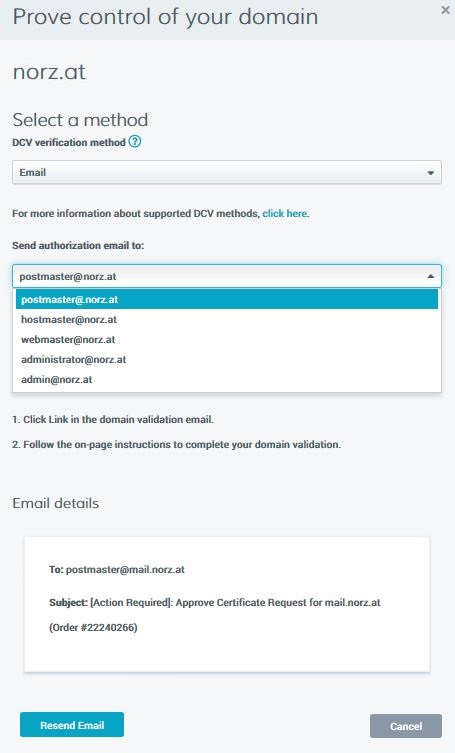 Just select any of these mail addresses. Digicert wills end a mail, containing a token. You have to submit this token to Digicert, so they are able to verify you got power over this domain
DNS-TXT validation
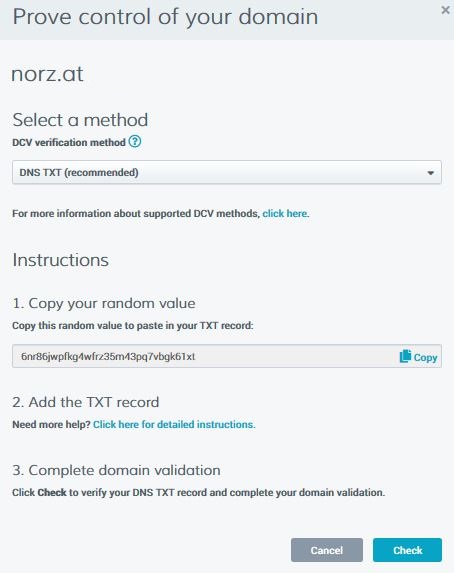
Create a DNS-TXT record containing this string and click check as soon as you can see this record doing an nslookup. The check will succeed if you did right.
nslookup -type=TXT norz.at
File Validation
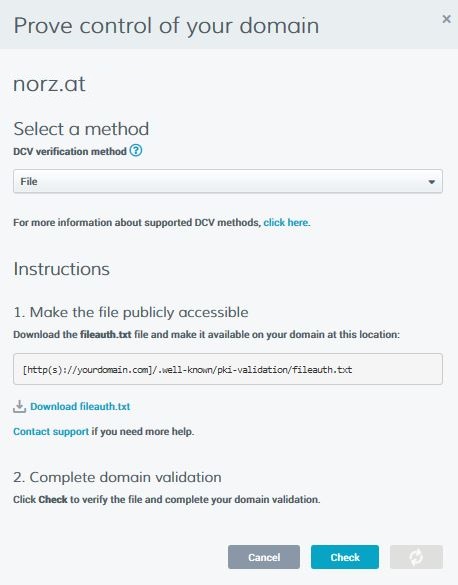 You have to download a file with name fileauth.txt and put it into /.well-known/pki-validation.
Downloading the certificate
Just some minutes after a successful verification you will be able to download the certificate file. There is no problem, if your session timed out, they will allow you to continue at any time (they will send a mail, containing a verification link)
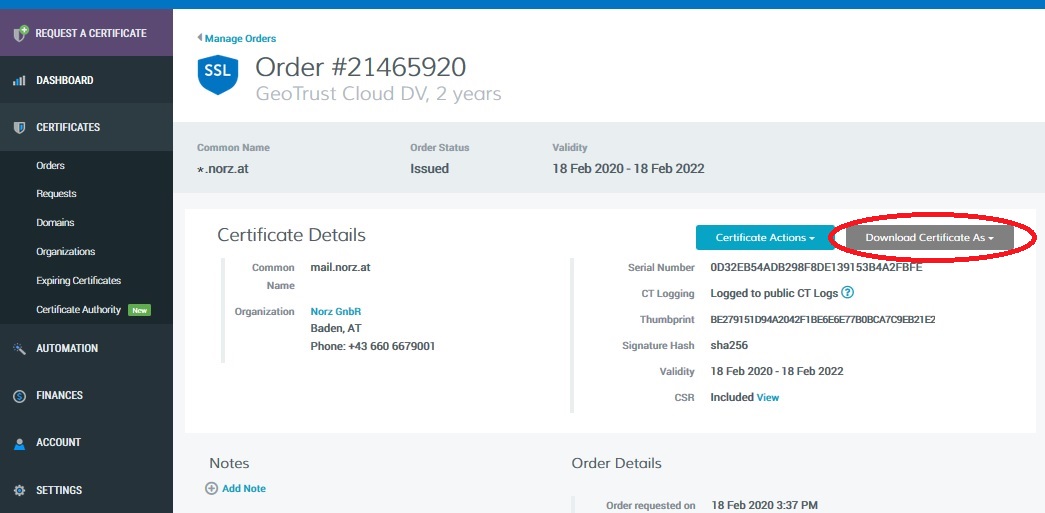
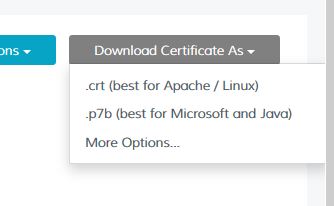 Download it in crt (best for Apache / Linux) format. You will get 2 files. In my case, they had been called:
norz_at_20858842DigiCertCA.crt: This is the certificate of the intermediate (so the actually signing) CA
norz_at_20858842norz_at.crt This is my brand new certificate!
We will need both of them to install this certificate successfully. From a security perspective, the two files are meaningless. Everyone can have them, as soon as they are installed in Citrix ADC / NetScaler, everyone will get them. What you have to watch out for is the private key, which is not included!
Right click the certificate and open in Notepad (or vi or whatever editor you like). The file should look like this:
 You can see: similar to the CSR, there is a —–BEGIN CERTIFICATE—– and a —–END CERTIFICATE—– tag. Don’t continue if your certificate looks different from that, just download it again, using a different format. Some CAs allow p7b only, this is Windows format. Citrix ADC allows to import p7b files from tools section in SSL.
Import the certificate into the Citrix ADC / NetScaler
Our last step in creating a certificate is to import the certificates into Citrix ADC / NetScaler and create the certificate object. The certificate object is a prerequisite for being able to bind the certificate to a vServer later on.
If we still have our Citrix ADC / NetScaler wizard open, we may just continue, otherwise we could either reopen the wizard, or install the certificate manually. I will do it manually.
Importing the server certificate
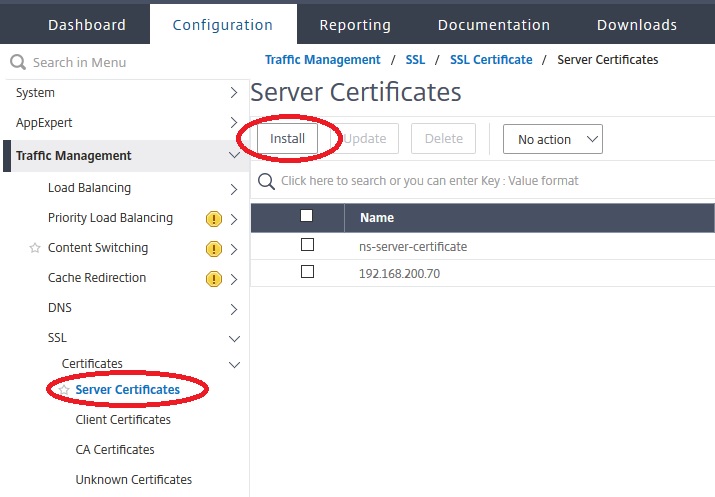 So we open the Install Server Certificate dialogue.
Next we import the certificate.
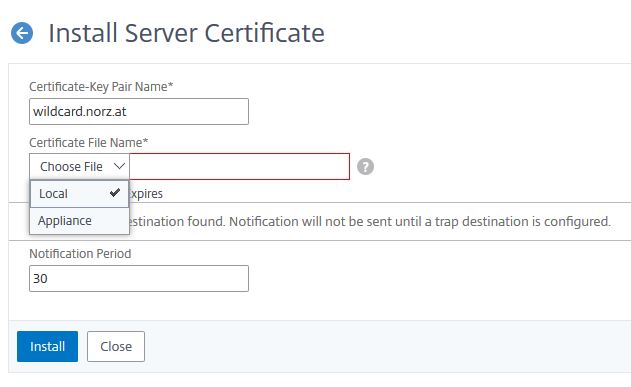 The file may be local (so on your work station) or on the appliance. If you select Local, the file will get copied to /flash/nsconfig/ssl.
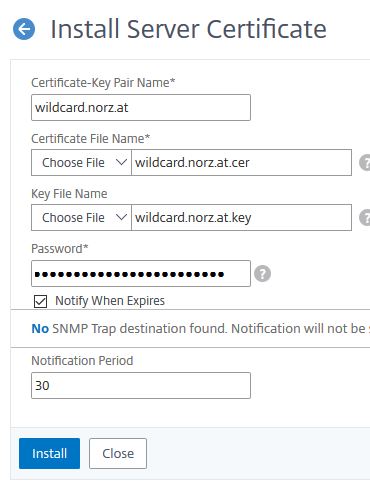 Usually, the key is already at the ADC, you need to specify the password. It’s wise to add a Notification Period. Citrix ADC / NetScaler sends … a day before the certificate finally expires a trap to the configured trap destination. Citrix ADM (formerly NMAS) can be used as a trap destination. ADM would then send an email to the administrators warning them about the certificate expiring soon. In parallel, I also have an appointment in my Outlook. There is nothing more stupid you could do, than allowing a certificate to expire, as it means a down to your services, and you can’t fix it quickly, but you rely on the speed of your certificate authority.
Importing the intermediate CA certificate
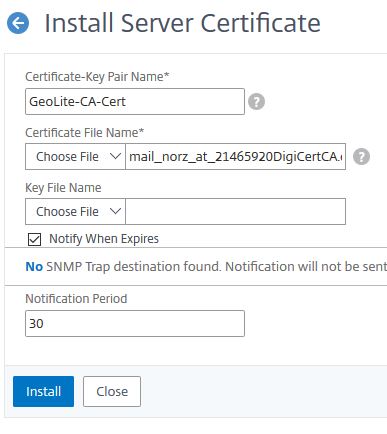 The import of the intermediate certificate authority certificate works in the same way as the actual certificate, but you do not have the key, so we leave this field empty. (Certificate authorities would never handle out their keys to customers)
Linking Certificates
Client operating systems typically have a list of trusted root certification authorities. This list is relatively short and often includes just root CAs, not the intermediate certification authority certificates. However, root CAs never issue certificates themselves, computers containing the actual root certification authority is switched off for security reasons and gets turned on only in order to be able to create intermediate certification authority certificates only.
In order for the client computer to be able to verify the certificate, the server must also send the certificate to the intermediate certification authority in addition to its own server certificate. The client will then check intermediate certification authority’s certificate using the certificates in the list of trusted root certificates, and only if this check was successful, it will check the actual server certificate against the intermediate certification authority’s certificate.
Be careful! Some browsers and operating systems have some intermediate certification authority certificates built into. This is particularly true for Google Chrome (and all browsers derived from it, such as Edge and Opera) under Windows. Everything seems perfect, if you check the vServer later on, however some users may be unable to connect even though. Therefore, you should always try using Mozilla FireFox, which has a completely different behavior. In the end, don’t forget to check the vServer with SSL-Labs SSL Test.
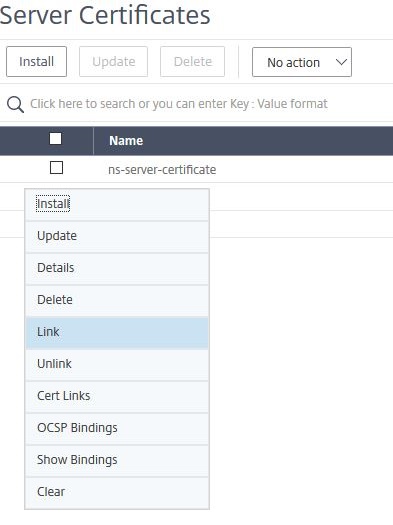 So we click on the symbol with the three dots in a circle, left to the certificate and select Link.
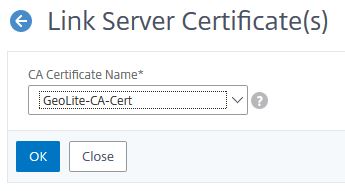
Usually the correct intermediate certification authority certificate is already pre populated and we only have to click OK.
 We are done, our certificate had been imported and installed. It can now be linked to a vServer easily.